


Better Engineering Through
Multibody Dynamic Simulation
April 2019 | Issue #17
In This Issue:
• News Flash! 500 RecurDyn Corporate Customers!
• New in RecurDyn V9R2: CAD Import Enhancements
• User Tip: Differences between ‘Merge’ and ‘Unite’
• User Tip: How to plot a curve for a specific range
News Flash! 500 RecurDyn Corporate Customers!
MotionPort is extremely pleased to announce that there are now over 500 RecurDyn corporate customers worldwide.
It is a notable milestone for a mechanical computer-aided engineering software company to attain this number of corporate user accounts.

A longer article about this achievement will be placed on the MotionPort website in the near future.
The Chairman of the Board of FunctionBay, Professor Jin-Hwan Choi said, ” I believe that the main reasons that we could attain this milestone are: 1) The full functionality of RecurDyn for multibody dynamics and related multi-physics simulations, 2) The regular introduction of new cutting-edge technologies into RecurDyn to address customer needs, and 3) customer satisfaction due to fast and competent technical support throughout the world.”
Brant Ross, owner of MotionPort said, “It has been an amazing journey to see the growth of RecurDyn capabilities over the past 19 years. At the same time there has been a tremendous expansion in the number of customers. We believe that many more opportunities exist for us to provide excellent value to new customers using RecurDyn, and we look forward to doing so.”
For further information contact us at: https://motionport.com/about-us/contact-us.
New in
V9R2:
CAD Import Enhancements
RecurDyn V9R2 provides new ‘Import CAD’ functionality that allows the user to create Bodies and Subsystems that contain multiple geometries (merged) based on the hierarchical structure of the original CAD database.
 An intuitive user interface allows the user to organize the geometry so that desired geometries are properly grouped and that unnecessary geometries are not imported.
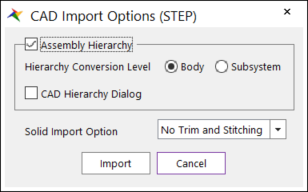
First, the user sets ‘CAD Import Options’ that are explained below and shown in the image:
• Hierarchy Conversion Level: The user can select the target of the grouped CAD hierarchical structure to be a Body or Subsystem.
• CAD Hierarchy Dialog: By checking this option, the user can edit the hierarchical structure of the CAD file in detail, deleting or merging the geometry, before importing the CAD file into the RecurDyn database.
Note that the CAD Import Options dialog can be enabled/disabled by the checking or unchecking the option, ‘CAD Import Options Dialog when Importing CAD Files’ that can be found under the Home tab, in the Setting group, and in the CAD command (in the same stack as the Display command).
The dialog box below is where the user can change the grouping of geometry by dragging and dropping the name of the geometry. A click of the right mouse button brings up a variety of other edit commands.

RecurDyn News & Tips
User Tip:
Differences between ‘Merge’ and ‘Unite’
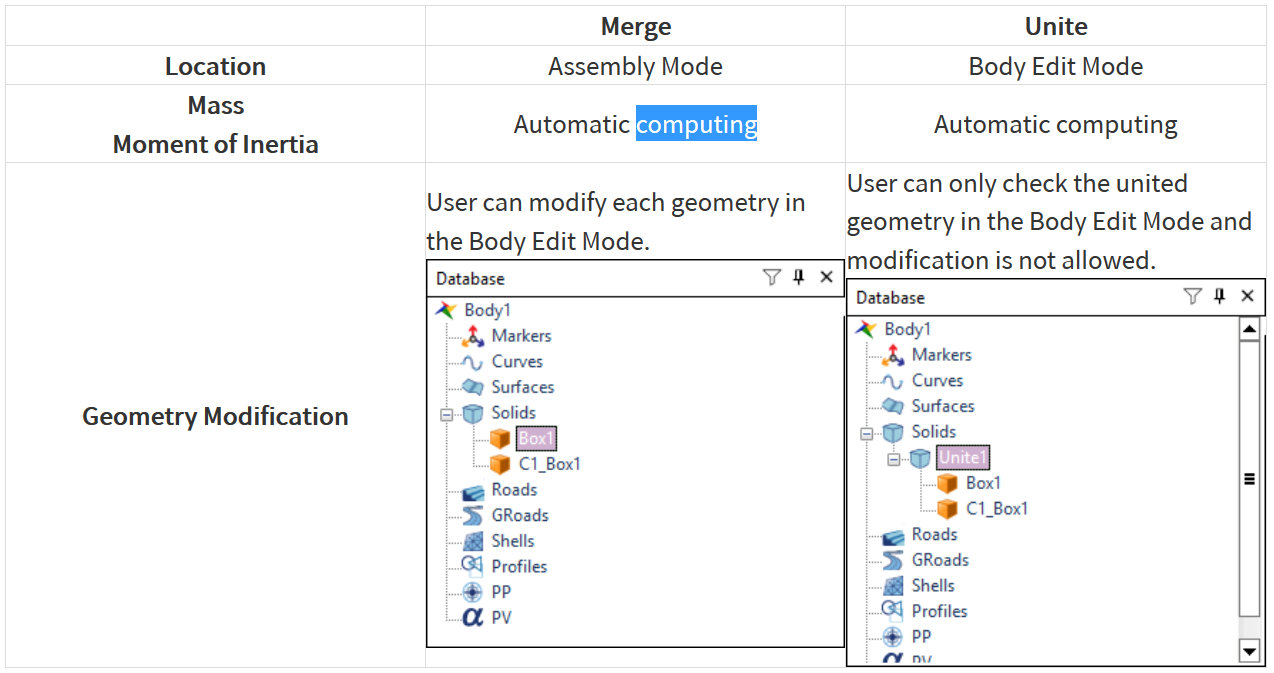
When the RecurDyn analysis is executed, the results of Reaction Force, Contact Force, and Stress, etc. caused by the combined, non-overlapping geometry are the same when using the Merge or the Unite function.
The function of ‘Merge’ in the Home tab and ‘Unite’ in Body Edit Mode is basically to create one geometry by combining multiple geometries, but Merge and Unite work differently. The main difference between the Merge function and the Unite function is:
• Merge is performed in the Assembly Mode and the geometries are grouped into one body but remain as separate solids.
• Unite is performed in the Body Edit Mode, and several geometries are converted into one solid geometry with an actual Boolean operation.
Depending on which function is selected, there is a difference when modifying geometry. Please refer to the table below:
User Tip:
How to plot a curve for a specific range
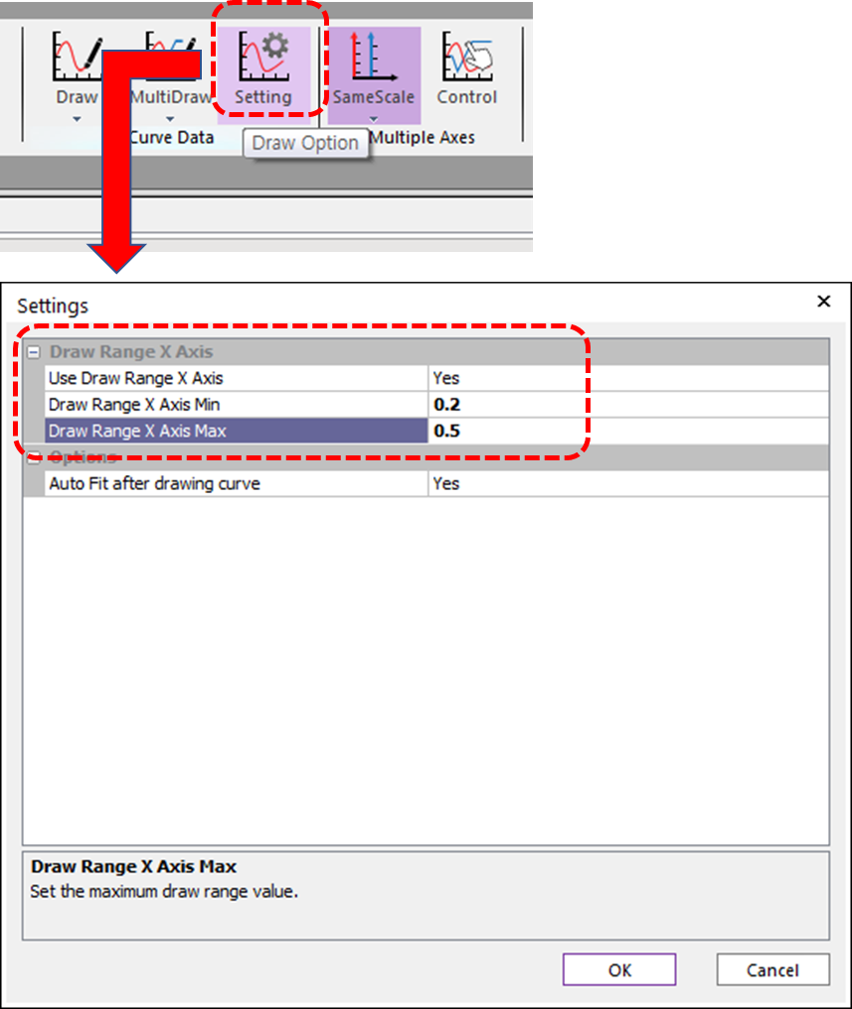
By default, RecurDyn/Plot plots curves from the start of the simulation (0 sec) to the end time of the simulation.
Even if you zoom in on a section and draw a new graph, the screen resets to show the graph from the beginning to the end of the simulation.
So, how can you plot the curve for the range from 0.2 to 0.5 seconds? The answer is to use the Draw Range function in the Settings window. In RecurDyn/Plot, under the Home tab, in the Draw group, click the arrow below the Draw icon, and then click Setting to open the Settings window.
Set the Use Draw Range X Axis option to Yes to activate the min and max draw ranges for the X axis fields. Set the min value to 0.2 and the max value to 0.5, and then click OK. Now, when you plot the curve, only the data for the selected range appears in the curve.
(Note: To restore the plotted curve for the entire time range, set the Use Draw Range X Axis option to No or reset the minimum and maximum values.)
The Settings window also includes an option to Auto Fit the plotted curve. Set this option to yes to automatically fit the new curve to the screen after drawing it.
Want to learn more about how MotionPort can help you with your projects? Contact us today to schedule a free web meeting to learn how RecurDyn, Particleworks, and MBD for ANSYS are helping our clients and how they can help you.
MotionPort LLC | St. George, UT | www.motionport.com
Click here to unsubscribe